Pages

Jumat, 09 September 2016

What Killed the Kayak Aleut Version Akutan Alaska

Akutan, Alaska is an island in the Aleutians and once a place where people paddled kayaks as a part of making a living.  Nowadays the biggest industry on the island is a fish processing plant.  Trawlers scrape the bottom of the ocean for fish and bring them to the processing plant to have them turned into product suitable for sale in the lower 48. The Aleut population of the island actually has very little to do with the fish plant other than extracting rent from them.  Still, the kayak as a tool for hunting, fishing and whaling is no longer in use.
The fish plant at Akutan.
Photo courtesy of Kurt Schmidt

The big  rusty things are doors on a trawl. Picture a net like a large sock with one of these doors on either side sliding along the bottom and funneling fish into the sock.  Nothing escapes.
Human added for scale.
Iron weights hold the bottom of the net close to the bottom of the ocean.
Nets.

Nets.
Bye, bye Akutan Kayaks.

Read More..

Rabu, 07 September 2016

Musings on how to make the seats

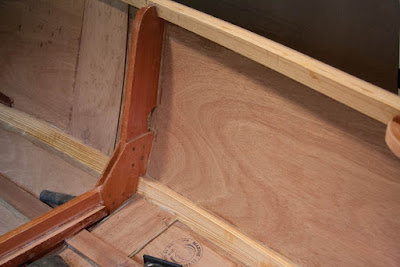
The original Glen-L plans call for a seat riser that runs from the forward frame to the transom, passing through this cutout in Frame #1.

So, Im in this "blocking" phase. The next step is to attach blocking on the sides of the hull to support each end of the rear seat. (Basic "bench" seats are also called "thwarts" in nautical terminology.)

The original plans call for a full-length seat riser to be attached to the sides of the hull. Thats the purpose for the unique cutouts on the sides of Frame #1 that youll see on the Glen-L Utility model. So far, there arent a whole lot of well-documented Utility builds. However, among those Ive seen, most do not use the full-length seat riser. Instead, these builders simply attached blocking to support the seats.

The original plans also call for 2 separate aft seats, on either side of the boat. Im not going to do that. I want a simple back thwart, and front thwart.


Glen-L line drawing of the Utility
I debated on the full-length seat riser. However, I decided against it for a few reasons. One is time, as Im now quite anxious to get this boat in the water. Another is the fact that Id have to either cut the frame cutout more, or plane the full length of the seat risers, because my cutout is less than a "store-standard" 3/4" depth. A third reason is the fact that Id also have to make another cutout in the seat riser itself, to accommodate the butt blocks that connect the side panels of the hull.

Nope. Simple blocking it will be.

The next question is, "How to attach it?" I realized that if I install the blocking on either side first, then Im taking something of a gamble on them actually being on exactly the same plane. I do not want my seats to slant, obviously.

The other matter to attaching the blocking on the sides first, is the fact that Id have to retrofit the center support. I have already planned to build a different type of center support than Glen calls for, anyway.

How my center supports will differ:
Glen calls for 2 plywood center supports for the front thwart. These supports are glued to either side of the keel, and then attached to either side of blocking that is underneath the thwart itself. Like this:


Glen-L Utility
A Glen-L Utility at the "G8" Glen-L Gathering in 2014. Thanks to the kindness of this boats owner, I was actually able to drive this one & take one of my children out in it. Note the construction of the center support under the seats.
Im planning to build a different type of center support, based on one I saw in a photo of a 1935 Riva. Mine will have a single plywood support, mounted on top of the keel, on the centerline. I will have 1" x 1" blocking on either side of the plywood support, both at the top and bottom.

Center seat support on a 1935 Riva
Back to the point...
I had another idea. What if I build & install the center support first, then make sure the thwart is level... then, use the thwart itself as a point from which to install the blocking on the sides? It seems to me that Id stand a better chance of having the seat installed level, once its all done.

So first, I marked the sides, where the top of the blocking (seat riser) should be, at right angles to the frame. Then I taped twine from measured points on these lines, stretched across to the other side. Measuring the height from the keel to the twine, I found that each point was 8 inches.


I plan to make the thwart 12 inches wide. I want the center support to be slightly narrower, so I decided it should be 10 inches. Knowing that I plan to use 1" blocking, I then had the dimensions I need to draw out the center support.


Half-breadth of the seat support, drawn out on the computer.
So, I drew the half-breadth of the seat support in Adobe Illustrator & printed the pdf full-size. I then cut out the print & traced it, full width, onto poster board. Once I cut that out, I had a template which I can now transfer to the plywood.

Poster board template for the center support. So far, so good...

The next step is to actually build it. 

Lets hope all this works.


Read More..

Selasa, 06 September 2016

Seat bulkheads

I finally realized that with the temporary center  bulkhead in place, aligning the seat bulkheads was very easy.  Shape them, then temporarily screw to the bulkhead while the glass and tape set up on one side.  I will remove the temp bulkhead this week and finish the seat framing.  


In preparation for setting the centreboard case, I decided to put the seat framing in to help line things up.  Interesting problem in that striking a line 16.25" off the centerline from the forward bulkhead to the stern bulkhead was more difficult than I thought. It actually took me three tries to get a line that measured correctly from stem to stern.  

This got easier when I cut access slots through the temporary bulkhead, then ran the lines through the slots and up to the bow.  I made a wooden measuring device 32" wide and marked the center.  Then I ran the lines up both sides keeping the tool centered over the C/L.  This looks good to me.  
Next, I made a template from some cardboard and transferred the lines from the plans onto the cardboard, then cut and fit the boat with a little trimming and filling to make it all look good.  I have now glassed in one side of the bulkheads and will remove the temporary bulkhead after the epoxy has set.  

Hope to get the framing in place next weekend, and perhaps the seat chambers constructed.  This will help me get the Centreboard case level and positioned correctly.  

the thing sticking up from the bulkhead top is a spring clamp that I use to hold the roll of glass tape for easy access.  

I realized that the lines I put on, were actually 16" off the centerline, that would be to the outside face of the plywood.  The framing needs to be at 16.25" off the centerline. Easy to fix. 


Read More..

Beginning the deck framing


Primarily due to budget restrictions at the moment, I decided to build the deck framing out of southern yellow pine. After digging through every board at Lowes until I found one with relatively vertical grain (if its a good 45° diagonal or better, Ill take it), I walked out with enough wood to build the deck framing for about $7. Not bad.

Besides, Ive entrusted my chines and sheers to this strong, flexible, and affordable wood, so I have no problem at all using it for deck framing.

The first step was cutting the actual deck beam (the part that fits crosswise from sheer to sheer). The widest distance at the blocking for the deck frame measured 42 inches. So, I measured & marked the board, and cut it with my circular mitre saw set at 20° to match the curvature of the sheer. Then, I clamped the cut board to the back of the forward frame, and traced the curvature (crown) of its deck beam onto the pine.

I cut it, and fit it into place. The photos easily tell the rest...

Deck beam clamped into place against the blocking on the starboard side.

Once the deck beam is epoxied into position, I will add additional blocking on the forward side, like this.


Port side, with the deck beam and forward blocking clamped into place.


Thank you for taking the time to read my blog, by the way. I hope that you find it helpful.
Read More..

Fairing day part 1

today, I sanded away all the high spots on the seams, and shaped the centerboard trunk slot using a router, and 7" disc grinder (aka wood eraser).  My arms are sore, but things are relatively fair.  I will need to order the fiberglass this week.   The plan is to use wide 6 oz cloth cut on a 45 degree bias, then apply 6 oz cloth over the whole hull.  This will be a long and tedious, messy task but will add value and years to the boat as well as much needed protection from rocky beaches.  I will put the keel on afterwards.


the PVC roller system is working very well to get this in and out.  

Read More..

Kamis, 01 September 2016

Radiation

You may or may not have heard about Fukushima, Japan where a few years ago a large earthquake and the giant wave that resulted from it badly damaged a number of nuclear reactors at an electric generating station adjacent to the Pacific Ocean.

When the reactors were first damaged, they released a bunch of radioactive material into the air.  Prevailing winds being what they are, they carried the radioactive material from east to west and deposited some of it westward of Japan.  Supposedly the material reached the west coast of the North American continent in about 3 days and as far as I can tell kept on moving in an easterly direction where it deposited more of this radioactive material.  Eventually, I suppose, the radioactive material all drops to the ground and into the water.  By now, not much of it is still blowing around.

 But aside from the initial material released into the air, there is an ongoing release of radioactive water being dumped into the ocean at Fukushima where currents disperse it and bring it to the west coast of North America. The radioactive water is radioactive because it is being used to cool various radioactive materials at the Fukushima generator site.  The radioactive water is being dumped into the ocean not as an act of maliciousness, but because so much of it is needed to keep the radioactive materials from melting that there is no place to store it - hence it is dumped into the ocean. Not cooling the radioactive materials would supposedly cause them to blow themselves into the atmosphere which would be worse than the slower dispersal caused by dumping the cooling water into the ocean.
Like all things technological, this was carefully thought out.
The radioactive material brought to us by the ocean currents takes longer than transport by air.  Supposedly 2014, that is, this year is when the first of it arrives on the shores of North America.  And thanks to ongoing dumping of radioactive cooling water at Fukushima the plume of radioactive water is getting refreshed with radiation on an ongoing basis.
Meanwhile, various life forms in the ocean ingest the radioactive material.  Fish do, mollusks do, seaweed does. Anything living in the ocean and swimming through the plume of radioactive water generated at Fukushima picks up radioactive materials.

What is not clear is how harmful the radiation is.

One opinion - from the movie Repo Man quoted here.

"J. Frank Parnell: Ever been to Utah? Ra-di-a-tion. Yes, indeed. You hear the most outrageous lies about it. Half-baked goggle-box do-gooders telling everybody its bad for you. Pernicious nonsense. Everybody could stand a hundred chest X-rays a year. They ought to have them, too. When they canceled the project it almost did me in. One day my mind was full to bursting. The next day - nothing. Swept away. But Ill show them. I had a lobotomy in the end.
Otto: Lobotomy? Isnt that for loonies?
Parnell: Not at all. Friend of mine had one. Designer of the neutron bomb. You ever hear of the neutron bomb? Destroys people - leaves buildings standing. Fits in a suitcase. Its so small, no one knows its there until - BLAMMO. Eyes melt, skin explodes, everybody dead. So immoral, working on the thing can drive you mad. Thats what happened to this friend of mine. So he had a lobotomy. Now hes well again."
Others are not so optimistic.
I am personally curious - so I bought a radiation detector and started measuring radiation on my own.  More on the results in another post.
Read More..

Unangan Aleut Paddle Orientation Revisited

I already have two posts on how Unangan paddlers held their paddles.  To read them, type paddle orientation into the blogger search box on the upper left side of your screen.
Most recently, I have been having conversations with Rob Macks of Laughing Loon Kayaks and he graciously gave me access to some pictures he took of Unangan paddles when he last visited the Smithsonian Institution. Unfortunately I cant post them without the permission of the Smithsonian so I will resort to photos I have posted before.
I havent seen any Unangan paddles in person, nor handled them.  Rob has. What he pointed out to me is that the Unangan paddles have looms that are roughly triangular with one of the corners of the triangle lining up with the ridge that runs down the center of one side of the paddle.  The looms are also quite deep, commonly about 1-3/4 inches.  The base of the looms triangle lines up with the flat side of the blades.  What Rob pointed out is that trying to hold the loom with the ridge of the blades facing backwards is uncomfortable because trying to paddle that way has the ridge digging into your palms.
To test the idea of the uncomfortable loom, I carved a loom section out of a piece of two by four with a dimension of 1-3/4 inch deep and 1-1/4 inch wide and roughly triangular with rounded edges so it became more egg-like than triangular in cross section. 
Well, the loom seems a little more comfortable held as shown in the photo below, but not all that uncomfortable the other way around either.  What might be more of an issue, and I have noticed this with one paddle that I made is that a loom with a 1-3/4 inch by 1-1/4 inch cross section is that a loom with these proportions limits how far you can rotate it in your hands to get the right blade angle for efficient paddling.
I will be making a paddle with a loom that is an accurate replica of the Smithsonian type paddles to test this hypothesis.  The idea is that the triangular loom shape will orient the paddle in a favorable way when held flat side back and an unfavorable way when held ridge side back.  
So here is a photo of an Unangan paddler with his paddle.  He looks like a real paddler and so I would expect that when posing for a picture, he would hold the paddle the way he would hold it for paddling, that is, flat side facing backward. Note that the paddler is holding his paddle where the loom transitions into the blade.
This appears to be where you would be holding that paddle while paddling. If you click on the picture above, you will see that that is where the front paddler is holding his paddle.
None of this is conclusive of course, but I suspect that a lot of the dispute about how Unangan paddlers held their paddles has to do with opinions based on Unangan style paddles that arent very close replicas of the originals.  How you hold a paddle has a lot to do with what is comfortable for you and that has a lot to do with how the paddle was carved and also with how the blades were carved.  Some fairly subtle variations in construction of both loom and blade can easily bias use of the paddle either ridge or flat side towards the back. And as I noticed with my own Unangan style paddles is that I can use them either flat or ridged side back and both ways work although flat side back typically generates more thrust.
Another thing I noticed while looking at Rob Macks photos of paddles is that on some of them the ridge on the blade was not sharp but rather about a half inch wide and flat.  This type of paddle looked like the basis for the one with the groove down the spine.
One of the paddles in the Smithsonian was also quite long, 8 6" according to Rob.  It falls into the category of extra long paddles that Jeffrey Dickrell, historian of Unangan kayaks has reported seeing in some historical photos.
So there you have it.  All in all, I suspect that Unangan paddles varied a bit from place to place and from paddler to paddler.  I also suspect that once Russians pressed Unangan paddlers into hunting sea otters for them, paddle and kayak styles became more homogenized than they were before the arrival of the Russians.

Read More..