Pages

Tampilkan postingan dengan label 1. Tampilkan semua postingan

Selasa, 06 September 2016

Fairing day part 1

today, I sanded away all the high spots on the seams, and shaped the centerboard trunk slot using a router, and 7" disc grinder (aka wood eraser).  My arms are sore, but things are relatively fair.  I will need to order the fiberglass this week.   The plan is to use wide 6 oz cloth cut on a 45 degree bias, then apply 6 oz cloth over the whole hull.  This will be a long and tedious, messy task but will add value and years to the boat as well as much needed protection from rocky beaches.  I will put the keel on afterwards.


the PVC roller system is working very well to get this in and out.  

Read More..

Sabtu, 23 Juli 2016

1 seat attached 1 seat coated Primer finally on sheer

Well, the title kinda says it all. So, lets get right to the pictures:


Here is the trimmed rear thwart, waiting for its first "finish" coat of epoxy on top. The plan was to mix some epoxy, coat the thwart using a thin foam roller, squeegee it, then thicken the rest of the epoxy with silica for attaching the forward thwart permanently.

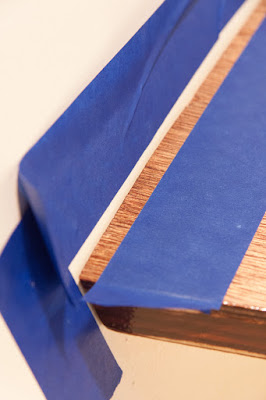
I taped off areas on and around the forward thwart, to both mark where to place thickened epoxy and to make clean-up go more smoothly.

As you can see, there is a considerable gap between the thwart and the side of the hull on the starboard side. The gap is several inches long & gets progressively wider aft. The joint at the forward edge is considerably better. I knew it would take big globs of VERY thick epoxy to fill this gap.

The gap on the port side wasnt so bad.

First epoxy coat rolled & sqeegeed onto the aft thwart.

Heres that big gap filled with thickened epoxy. Before removing the tape, I used the curved corner of the squeegee to shape the epoxy edges.

Improvised bracing to help make sure the thwart was pressed down solidly and level.

Improvised bracing to help make sure the thwart was pressed down solidly and level.

I wanted to get a photo of this filled gap before I painted over it. This is from where I had to remove some material from the corner of the outer sheer lamination in order to get it to bend into place. I removed a little too much, leaving this gap. During installation of the sheer, I heaped on the thickened epoxy in order to fill it. This is the port side joint between the sheer and transom.

First layer of the AquaGard 190 primer on the port sheer.

First layer of the AquaGard 190 primer on the port sheer.

First layer of the AquaGard 190 primer on the port sheer.

Read More..

Kamis, 30 Juni 2016

The Utility part 1 Getting started

The Glen-L Utility is a simple but classic 1950s utility / fishing boat. It is 11 LOA, with a 5 beam, wood foredeck, open cockpit, and simple thwart / bench seats. Specs say it can carry up to 3 average passengers. Most of the photos Ive seen of them show basic tiller outboard steering. I got my plans around early April of 2012 & got started immediately.

Having learned my lesson about asymmetry in the construction of the frames, I approached the Utilitys frames very differently. First, I drew out frames 1 and 2, as well as the keel  backing, full-size on a sheet of 1/4" marine-grade Douglas Fir plywood.


Frames & keel backing traced out on the plywood.
Then, I traced all the frame members from the plans directly onto some 3/4" mahogany, and cut them out with much more care and attention to detail than I did with the Squirt. 

I learned an interesting thing about mahogany. Apparently, it is rather light sensitive. Driving home from the lumber yard, a small portion of the board was sticking out my back window. After about 2 hours in the sun, that part had turned considerably darker, as seen on the keel in the photo below.

Keel and frame members laid out on the plywood.
In order to maintain the best possible shape and alignment of my frames, I then epoxied the frame members directly onto the plywood. I later used the scrap from the cut-out portions of the plywood to make my remaining frame gussets.

I fastened the gussets onto the frames using Glen-L Poxy Shield epoxy, (thickened with #2 silica filler), and 1-1/4" bronze screws. The frames & interior surfaces of the transom were encapsulated with 3 layers of Poxy Shield. After each layer dried, I scrubbed & washed off the amine blush using dish detergent, warm water & a Scotch Brite pad. I also sanded lightly between the layers with 220 grit sandpaper.

Gluing the forward frame members onto the plywood.
The frame notches in the plans are 1" deep (other than the keel notch, which is 1-1/4"). Most stock sold as 1" these days is actually 3/4". If I were doing this again, I would probably change the notches to 3/4" in order to use some less expensive & more available boards.

Another thing I did differently than with the Squirt was to take construction of my building form much more seriously. I made it from 2x8s and 2x6s, with well-reinforced cross braces made from 2x4s left over from the Squirt form. I took a lot of care to make sure the surfaces were level, clamping them into position before fastening with 3" wood screws. Trying to build something with level surfaces on a sloped floor was a little tricky. The key is to mark the positions of the legs on the floor once youve gotten the parts level. That is, unless youre going to bolt the form to the concrete floor. Thats the preferred method, but several builders dont do that. I didnt.


Frames, transom and keel on the building form.

Read More..

Rabu, 13 April 2016

This Old Kayak Old Paint Part 1


People occasionally write me to ask whether they can use this or that material or process in the building of their boat.  I sometimes have answers for them and more often do not.  When I dont, I like to tell them to try whatever it is they are asking about and they will find out if it works or not and then they will be the experts on that particular topic.
In any case, I try a lot of stuff, more or less indifferent that a lot of it wont work.  I also am casual about boat storage so most of my boats are subject to accelerated aging. I also like to use off the shelf, not yacht approved materials to see whether there is a cheap way out of any particular conundrum.
So lets move on to todays topic, Old Paint. No not the horse.  Old paint that has turned dry and brittle and stressed and developed cracks.  To be more specific, old varnish.  Because the substrate of the varnish on a skin on frame boat is a flexible fabric, impact on the skin causes fractures in an interesting way. So proceed and feast your eyes on a variety of stress cracks in old varnish on a nylon skin.  Enjoy.
A small running critter.  The green flecks are fake gold leaf I put in the varnish.  The gold is actually brass and has oxidized to a green.


stretch marks.

Southwestern US petroglyph, what of, Im not sure.

and a braid.

More stretch marks.

This one kind of looks like an ancient shrimp fossil.

This one, Im not sure, kind of like a cartoon bird in flight.

Read More..