Pages

Tampilkan postingan dengan label seats. Tampilkan semua postingan

Rabu, 07 Desember 2016

Epoxy work on seats sheer and Zip parts

The last post left off with my having cut out a piece of Meranti for the rear seat. This weekend, I laminated that onto the A/C exterior plywood... and did a little more epoxy work along the way.
1/4" Meranti top for the rear seat
Just as Id done with the front thwart, I coated both mating sides with epoxy (not thickened), and held them together with concrete blocks and weights while the epoxy cured. I had just enough epoxy left over to also add a 2nd layer to the Zip transom knee.


Laminating the Meranti onto the rear thwart. I used the extraneous epoxy to encapsulate the underside of the front thwart, as well as the transom knee for the Zip.
Regrettably, however... after the epoxy cured, there remained a small gap.

And a dust bunny got stuck in the epoxy on the Zip part.
All this didnt go perfectly according to plan. After the epoxy had cured, I found a gap between the two layers that would need to be filled. Also, some dust had gotten stuck in the epoxy on the Zip transom knee. I am trying for substantially better fit and finish on the Zip, so I sanded off the dust bunny & planned to encapsulate with a third layer.

Logistically, I thought it best to encapsulate the undersides of both seats next. This would be the 2nd coat for the forward thwart. I planned to tilt the rear thwart just a little so that epoxy would run into the gap and fill it. Since I havent trimmed the Meranti top yet, this should help the epoxy flow down into the gap. With the extraneous epoxy, I planned to encapsulate the underside of the sheers on the aft third of the boat, as well as the Zip part.

I ended up having more left over epoxy than expected. So after quickly cleaning them off, I also encapsulated part of the Zip stem and the forward face of frame 5-1/2.


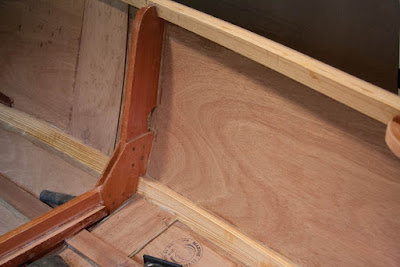
More encapsulation; trying to fill the gap on the aft thwart. Here it is propped up slightly with a scrap of mahogany left over from the quarter knees.

Epoxy drying on the Zip stem & frame 5-1/2.


Current Status of Zip Parts
PartStatus
Stem & Breasthook AssemblyMost surfaces have 1 coat of epoxy
Frame 5-1/2Forward face has 2 layers of epoxy. Other surfaces have 1 layer.
Frame 4Side members cut, but have not been planed or notched for sheer.
Transom KneeCoated with 3 layers of epoxy
TransomSide frame members cut 1/4" oversized on outer side. Have not been planed.
Read More..

Minggu, 02 Oktober 2016

Kayak Seats

While looking for something which I did not end up finding, I ran across these pictures taken several years ago at SSTIKS, the South Sound Traditional Inuit Kayak Symposium which takes place every year in the vicinity of Tacoma, Washington.  Its time to dust off these pictures and share them with the world.
(Side note 1 - Dusting off is a metaphorical term from the age of printed photos.  Since these photos have never left their digital format, the dust they may have gathered is strictly figurative.  Digital of course is forever or at least as long as the storage medium lasts and as long as you have some display technology and so they do not gather dust, not even figurative dust.  In real life, they just seem to disappear never to be found again.)
I have no particular agenda to this posting other than pointing out that when you make your own stuff, you get to have it your way, within the limits of your ability, of course.
 This is a molded seat which you can just stick into your kayak or if ambitious, you can glue it in place with contact cement. Note the coaming attachment.  (side note 2 - the white stuff on the ground is oyster shells, hard on bare feet.)
 This boat may be one of the Tom Yost model kayaks.  Coaming rim looks to be plywood. Back rest is a block of foam and the seat cushion is of uncertain origin, possibly foam inside a cloth sleeve or maybe one of those inflatable seats.
 Heres another back strap version, adjustable, possibly home made.  Seating is foam pads.
 Yet another foam solution.  The seating mat seams to have a sculpted seat under it.
 The frame of this boat is made out of bamboo and the mouth has a fanciful dragon design painted on it. 
 Cushions of the dragon boat have a tie dye fabric cover on them.  Note the hull stringers of bamboo.  If you click on this photo, you can see the innovative joining of stringer parts with the skinny end of the tapering bamboo pole overlapping.
 And yet another seat cushion.  This one looks like the level of complexity that I usually aspire to.  One reason my boats have no fancy seats is that it never occurred to me to put fancy seats in my kayaks since a simple mat on the floor seems to work.  However, if you come to DIY kayaks from the commercial realm, you are more likely to feel like you should put a fancy seat in your boat like the commercial kayaks have.
One last seat.  Looks like commercial back band with foam seat.
Read More..

Rabu, 07 September 2016

Musings on how to make the seats

The original Glen-L plans call for a seat riser that runs from the forward frame to the transom, passing through this cutout in Frame #1.

So, Im in this "blocking" phase. The next step is to attach blocking on the sides of the hull to support each end of the rear seat. (Basic "bench" seats are also called "thwarts" in nautical terminology.)

The original plans call for a full-length seat riser to be attached to the sides of the hull. Thats the purpose for the unique cutouts on the sides of Frame #1 that youll see on the Glen-L Utility model. So far, there arent a whole lot of well-documented Utility builds. However, among those Ive seen, most do not use the full-length seat riser. Instead, these builders simply attached blocking to support the seats.

The original plans also call for 2 separate aft seats, on either side of the boat. Im not going to do that. I want a simple back thwart, and front thwart.


Glen-L line drawing of the Utility
I debated on the full-length seat riser. However, I decided against it for a few reasons. One is time, as Im now quite anxious to get this boat in the water. Another is the fact that Id have to either cut the frame cutout more, or plane the full length of the seat risers, because my cutout is less than a "store-standard" 3/4" depth. A third reason is the fact that Id also have to make another cutout in the seat riser itself, to accommodate the butt blocks that connect the side panels of the hull.

Nope. Simple blocking it will be.

The next question is, "How to attach it?" I realized that if I install the blocking on either side first, then Im taking something of a gamble on them actually being on exactly the same plane. I do not want my seats to slant, obviously.

The other matter to attaching the blocking on the sides first, is the fact that Id have to retrofit the center support. I have already planned to build a different type of center support than Glen calls for, anyway.

How my center supports will differ:
Glen calls for 2 plywood center supports for the front thwart. These supports are glued to either side of the keel, and then attached to either side of blocking that is underneath the thwart itself. Like this:


Glen-L Utility
A Glen-L Utility at the "G8" Glen-L Gathering in 2014. Thanks to the kindness of this boats owner, I was actually able to drive this one & take one of my children out in it. Note the construction of the center support under the seats.
Im planning to build a different type of center support, based on one I saw in a photo of a 1935 Riva. Mine will have a single plywood support, mounted on top of the keel, on the centerline. I will have 1" x 1" blocking on either side of the plywood support, both at the top and bottom.

Center seat support on a 1935 Riva
Back to the point...
I had another idea. What if I build & install the center support first, then make sure the thwart is level... then, use the thwart itself as a point from which to install the blocking on the sides? It seems to me that Id stand a better chance of having the seat installed level, once its all done.

So first, I marked the sides, where the top of the blocking (seat riser) should be, at right angles to the frame. Then I taped twine from measured points on these lines, stretched across to the other side. Measuring the height from the keel to the twine, I found that each point was 8 inches.


I plan to make the thwart 12 inches wide. I want the center support to be slightly narrower, so I decided it should be 10 inches. Knowing that I plan to use 1" blocking, I then had the dimensions I need to draw out the center support.


Half-breadth of the seat support, drawn out on the computer.
So, I drew the half-breadth of the seat support in Adobe Illustrator & printed the pdf full-size. I then cut out the print & traced it, full width, onto poster board. Once I cut that out, I had a template which I can now transfer to the plywood.

Poster board template for the center support. So far, so good...

The next step is to actually build it. 

Lets hope all this works.


Read More..

Minggu, 28 Agustus 2016

Seats

Got time to put the seat sides on today.  There was a lot of scribing to the curve, but the fit is pretty good for government work.  Hardest part was tracking down where I had put the plywood panels!  

A side note for other builders,  the fit to the bottom does not need to be perfect,  You will be filling with epoxy putty and glassing on both sides, so a little gap will never be seen.  


View looking aft towards aft bulkead.  The plywood panel on top is the forward seating deck.


View from the transom showing the compartment just forward of the transom.  

A better view of the seats with the side panels fit.  Will glue up tomorrow.  


One more shot.  should have cleaned the bilge out first.  It is amazing how on any boat at any stage everything winds up in the bilge.  


Read More..