Pages

Tampilkan postingan dengan label preparing. Tampilkan semua postingan

Jumat, 04 November 2016

Grinding your Own

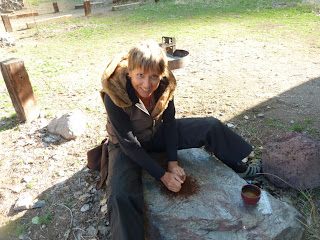
 A year ago or so we ran out of coffee while camping and while in town, picked up some more coffee.  I checked the bag that the coffee was in and it felt pre-ground.  Next morning when we got up to make coffee, the beans turned out not to be ground.  Luckily, there was a large rock at the edge of the campground and the banks of the river across the street yielded a mano, the stone you hold in your hands to grind the corn. With a little practice we managed to make a fine grind and breakfast was saved.
Closeup on the grinding operation.


 Of course, grinding stuff on stone grinders is nothing new.  It is in fact quite old and just recently, we visited Montezumas Castle in Arizona where a number of stone grinders were on exhibit.
 

 The stone grinders in the American Southwest are known as Mano and Metate, the metate being the large flat stone and the smaller one you grind with is called the Mano.
 A slightly different arrangement visible throughout California are large flat boulders that were used for grinding acorns, a staple food in much of California before the arrival of the Europeans.  Unlike the metate which is flat, the grind stones for acorns have conical pits in them.  This prevents the acorns from spreading about.  Any that escape in the grinding process can be easily swept back into the hole.
And here is a long view of the grinding rock.  Note that the rock had a number of pits in it and so had room for a number of women to go about their grinding in a sociable way.  The rock also happens to be conveniently located in a flat area surrounded by oaks.
Read More..

Rabu, 26 Oktober 2016

The Utility Preparing for Planking


A fellow boatbuilder pointed out to me that if I cover the transom first, before planking the sides and bottom of the boat, then the end grain of my planking is going to show around the rim of the transom. (Thanks Chris!) Of course, this only poses an issue if you plan on bright-finishing your transom, which is exactly what I’m planning to do. I’m planning to paint the rest of the hull. So, paint will cover the end grain of the transom as viewed from the side.

So now, my plan has changed to planking the sides and bottom of the boat first. The first pieces of planking that go on will be short 4’ aft sections on the sides. I will be butt-joining these pieces to longer 8’ pieces that will plank the forward sections on the sides. This will allow the butt joint to be located in the flatter aft section of the boat, which means it will be easier to do, and there will be less stress on the joint. I have to join the planking in sections like this, because plywood comes in standard 8’ lengths, and my boat is 11’ long.

In preparation for planking these aft sections, I’ve been sanding away dried runs of epoxy, etc from those parts of the boat I can’t easily get to once the planking is on. I’ve also worked to clean up the shape of the seat riser cutouts in frame #1. Still, before I can plank this aft section, I need to encapsulate these frame cutouts, as well as a couple of other places I won’t be able to reach once the planking is on.

Then, God willing, I should be able to begin planking the little boat.


Dried runs of epoxy have been sanded off of frame #1 and gussets. This is the starboard side.

Starboard frame #1 after sanding. The seat riser cutouts still need to be encapsulated with epoxy.

Port frame #1 after sanding.

Port frame #1 after sanding.

Port frame #1 after sanding.

The globs of epoxy are now sanded off of the transom.

Read More..

Rabu, 24 Agustus 2016

Preparing the stem for encapsulation

I should have encapsulated the stem a long time ago, before I ever attached it to the keel. Im not sure why I didnt. Nonetheless, I did not. I wont repeat that mistake on the Zip.

In any case, it needs to be done now before the planking goes on. In preparation for encapsulating the stem, I need to sand away several dried globs of epoxy that have been stuck on it since earlier stages in construction. The worst of these are directly behind the chines, where they are attached to the stem.

I worked on that a little earlier this morning. As this is the middle of the week, and free time is quite limited, Im expecting several more days of small, incremental progress in this task.
Read More..